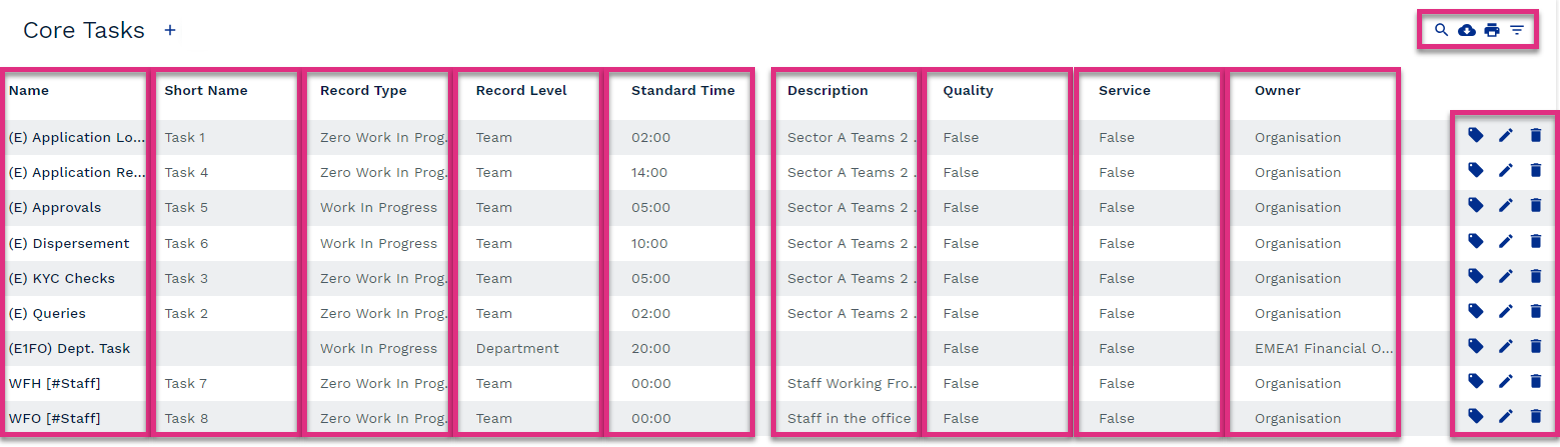
Within ControliQ core tasks are the activity that will be displayed to your team members to capture items of work out against in the chosen method of data capture.
When you select the Core Task link within the Add/View section of the Admin screen you will see a list of all of the Core Tasks that have already been created.
Name
Displays the name of the existing Core Tasks.
Short Name
Displays a shortened version of the Core Task name if one was added during setup.
Record Type
Displays the Record Type of the Core Task. This will be either Work In, Work in Progress or Zero Work in Progress
Record Level
Displays the Record Level of the Core Task either Team or Department, indicating at what level any Work in Progress is owned
Standard Time
Details the Standard Time assigned to the Core Task.
Description
Displays a description relating to the Core Task if one was added during setup. This description will appear in the Information button in RTM data capture.
Quality
Confirms if the Quality feature is enabled for the Core Task. This will display either True or False.
Service
Confirms if the Service feature is enabled for the Core Task. This will display either True or False.
Owner
Details the level of the organisation that owns the task and therefore the level of the organisation that an individual needs edit permissions to change the task.
Selecting the search icon will allow you to refine the list of Core Tasks displayed. You can search by partial or full Core Task names.
Select this icon to export the list of Core Tasks with their key attributes to MS Excel.
Click the print icon to print a list of the existing Core Tasks.
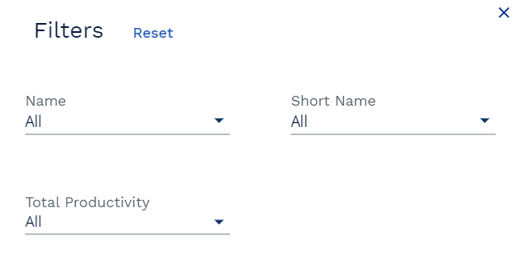
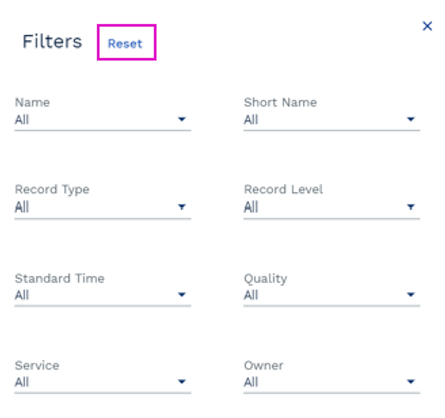
Click the Filter option to refine the list of Core Tasks displayed by key attributes. To utilise the Filters option, select the attribute that you would like to filter by from the drop-down menu in the pop-up box.
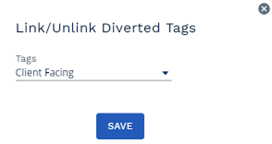
Clicking the Tags icon allows you to select Tags that you would like to assign or un-assign from the Core Task.
When the icon is clicked a pop-up box detailing the available Tags will open, select the Tags you would like to add or remove from the drop-down menu and click Save.
To edit an existing Core Task click the pencil icon next to its name to open the setup dialogue box.
To delete an existing Core Task select the trash can icon.
Please note that to delete a Core Task it must be unlinked from all workgroups first. Once deleted the Task will no longer be present in RTM or managed data areas, all historical data will be retained.
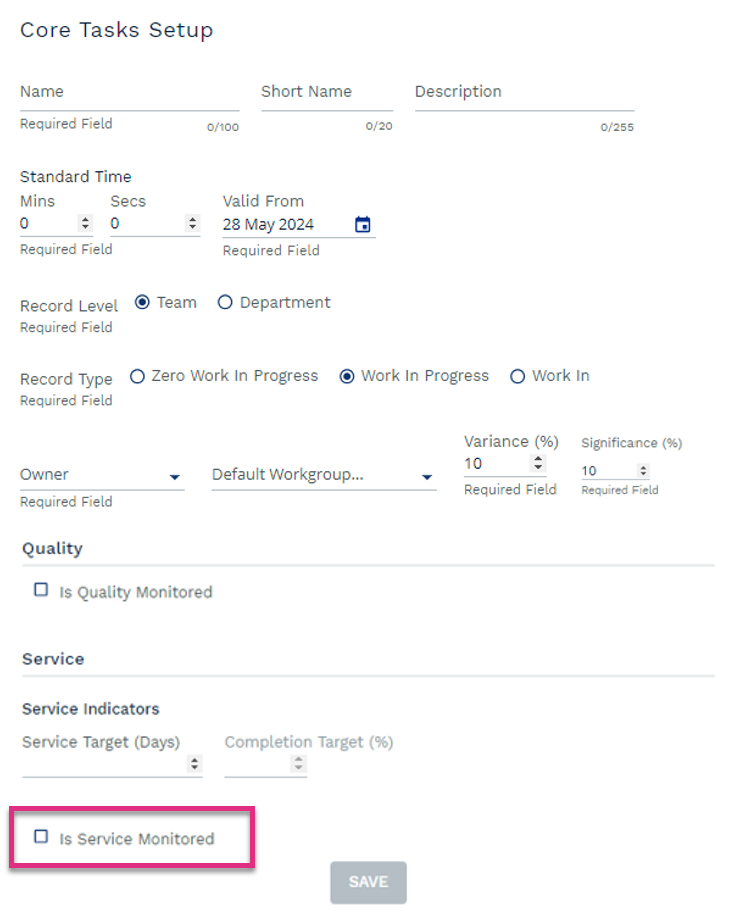
To create a Core Task select the icon next to the Core Task table header. This will prompt the Core Task setup form to open.
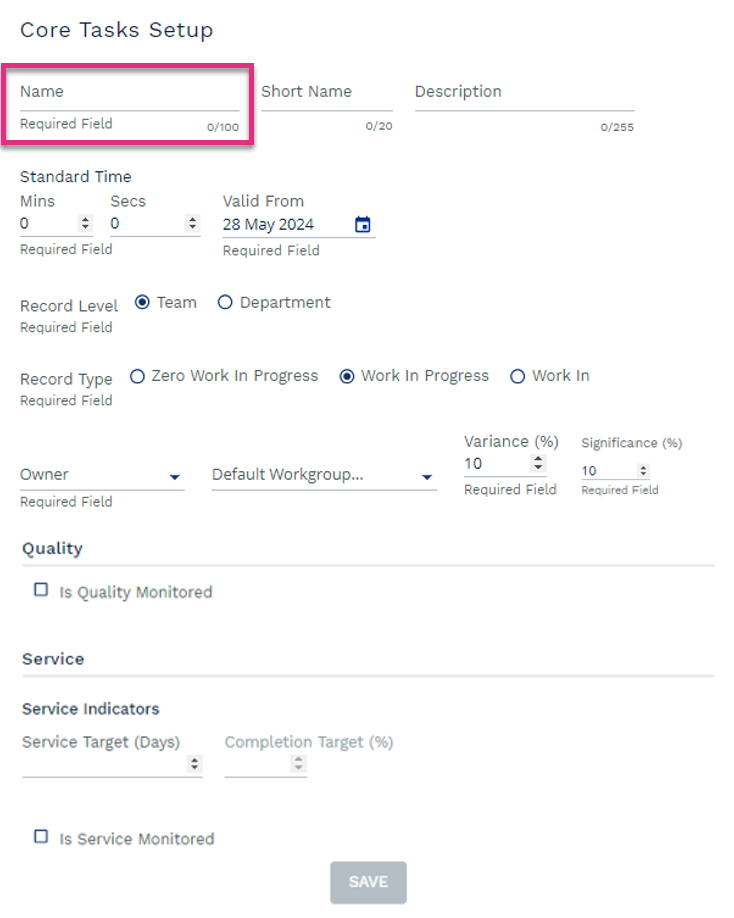
Name
Enter the name of the Core Task here (up to 100 characters) don’t forget to apply any standard naming conventions that have been agreed by your business.
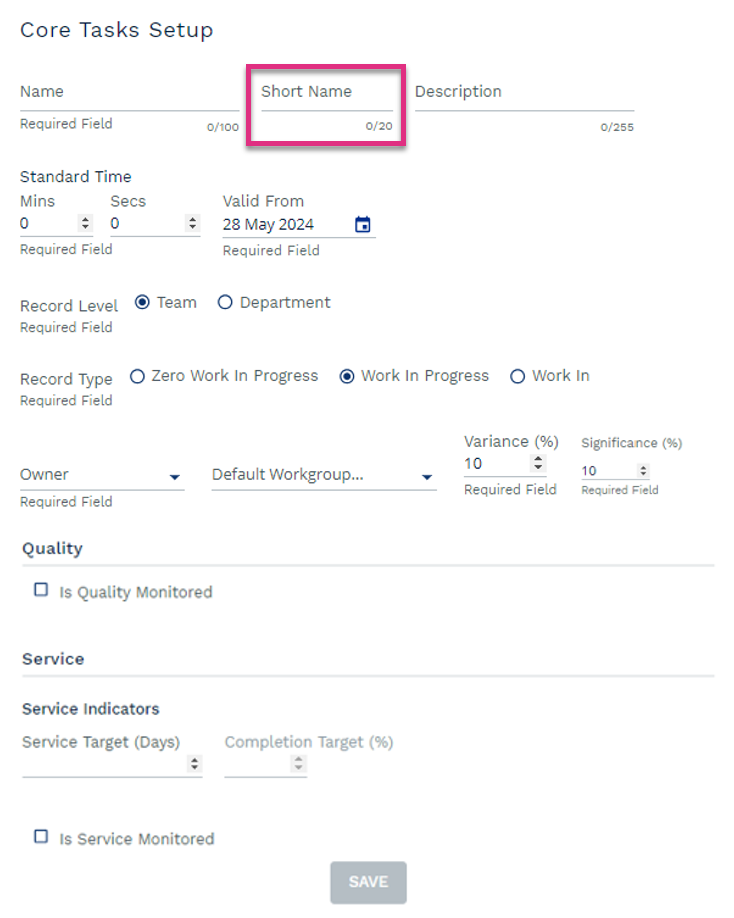
Short Name
This function will be applied to future development.
Enter the name of the Core Task here (up to 100 characters) don’t forget to apply any standard naming conventions that have been agreed by your business.
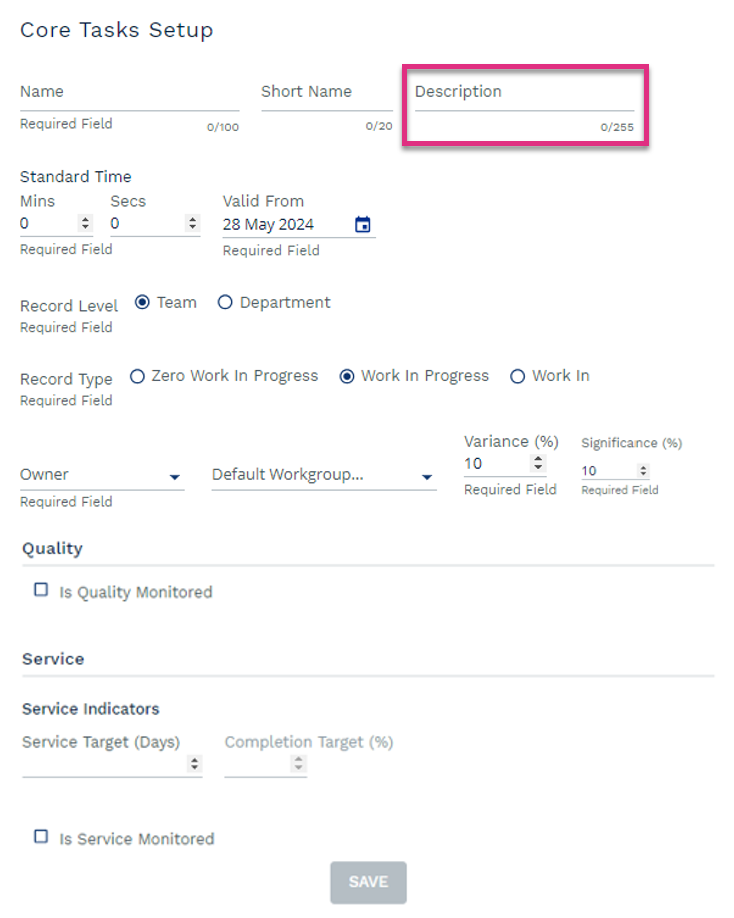
Description
You can add a description (up to 255 characters) to a Core Task, this description will then appear under the information button in RTM for users capturing data against the task.
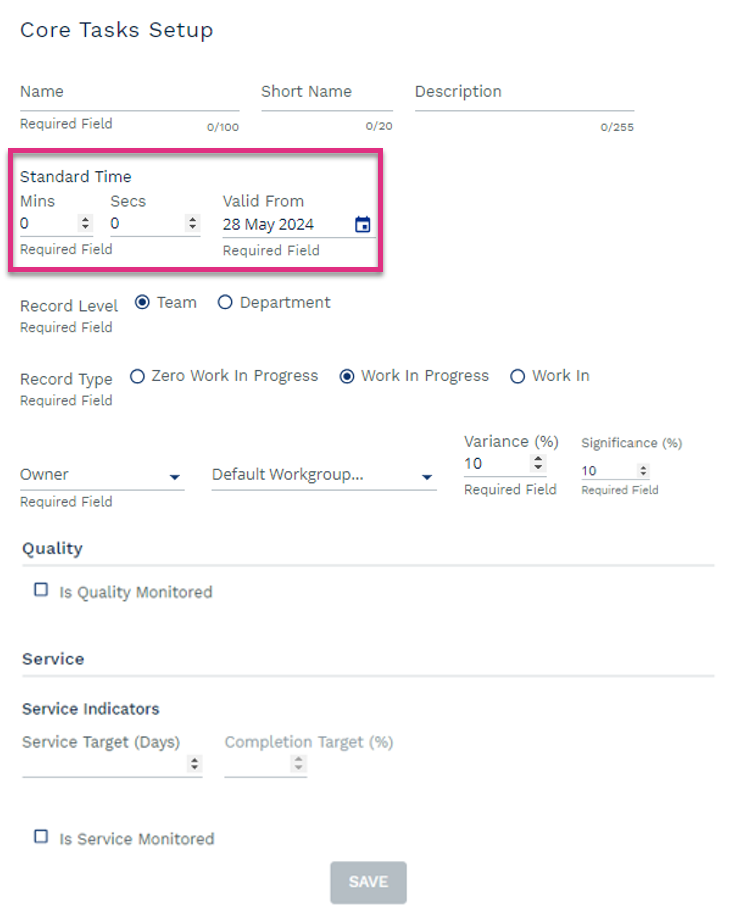
Standard Time and Valid From
Standard Time - Enter the agreed Standard Time for the task in minutes or seconds. If required, it is possible to leave this as 0 minutes and seconds although tasks with 0 Standard Time will not add to Work In, Work Out or WIP values when viewing data in the unit of time.
Valid From – Determines the date that the standard time of the core task is applied from. When editing tasks the date can be changed to backdate a time change.
Please note that if an edit is made to an existing task another change cannot be made for 2 hours.
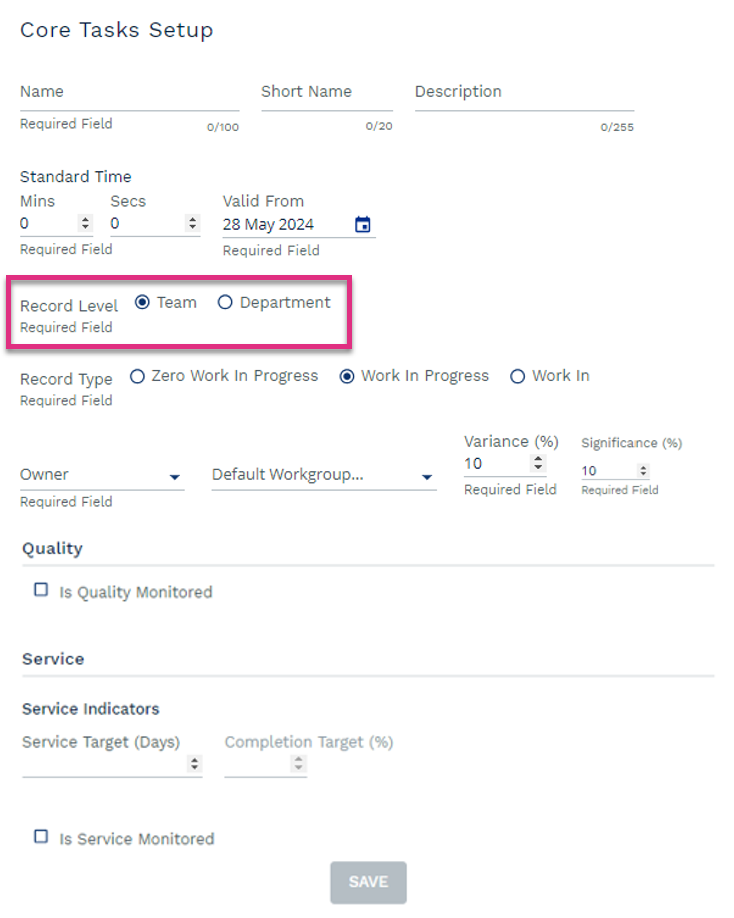
Record Level
Determines at what level of the organisation Work in Progress is owned.
Team – Work in Progress is owned by individual teams. Work In or Work in Progress is entered at a team level in the Manage Data screen. When planning Work in and Work in Progress values are planned at the team level. These tasks can only be linked to teams when assigning tasks.
Department – Work in Progress is owned by a department. Work In or Work in Progress is entered at a department level in the Manage Data screen. When planning Work in Progress values are planned at the department level, at a team level the tasks behaves as a Zero Work in Progress task. These tasks can only be linked to a level of the hierarchy created as a ‘department’ and will be inherited by all child workgroups. A department level task cannot be set as Zero Work in Progress.
Please note once set this option cannot be changed.
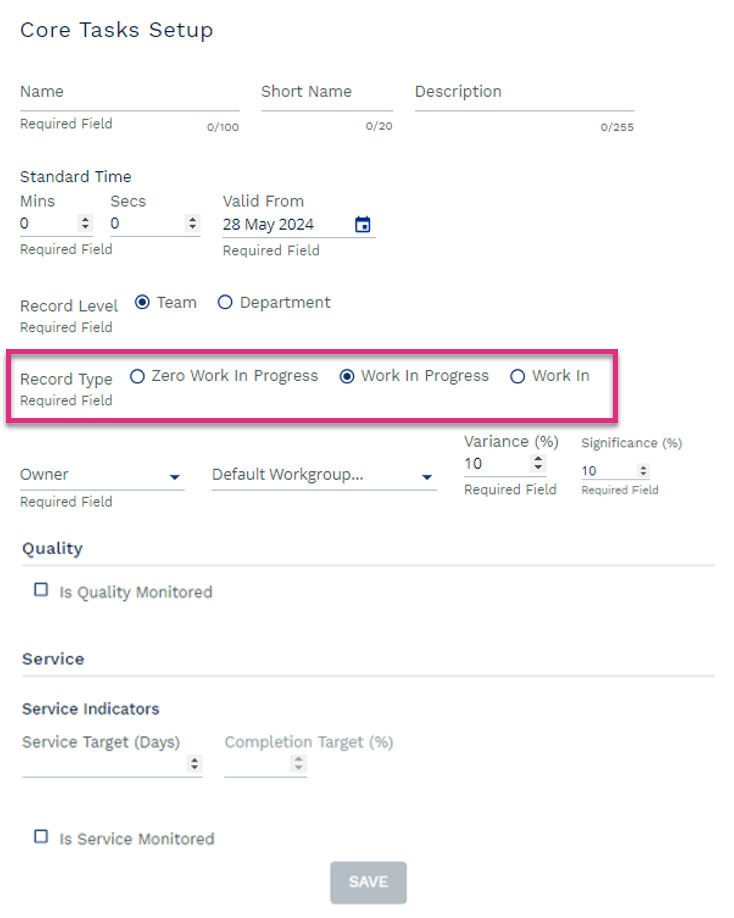
Record Type
Determines the Workgroup value that will be entered in Manage Data:
Zero Work In Progress – No Work In or WIP information is captured. The Work Out value captured by the team members is automatically entered as Work In for the day. When planning forecasted Work In is used to populate Work Out as no WIP can ever be carried for this task.
Work In Progress – The Work in Progress value for the end of each working day will be entered into Workgroup Manage Data and the Work In value will be calculated based on Work in Progress and Work Out values.
Work In – The Work In value for each day will be entered into Workgroup Manage Data and the Work in Progress value will be calculated based on Work In and Work Out values.
Please note that if an edit is made to an existing task another change cannot be made for 2 hours. If changing a task from Work In or Work in Progress to Zero Work in Progress all previously entered Work In or Work in Progress data will be overwritten. Work In will be amended to match Work Out and Work in Progress will be removed.
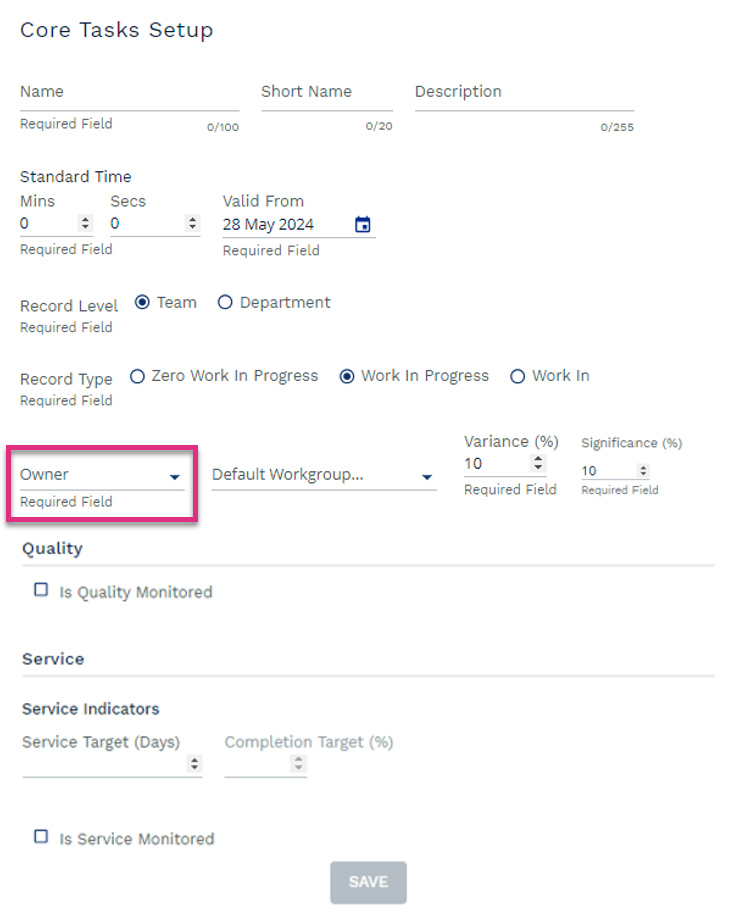
Owner
Specifies which workgroup in the organisation owns the task and determines the level of the hierarchy that an individual needs edit permissions for to make amendments to this task.
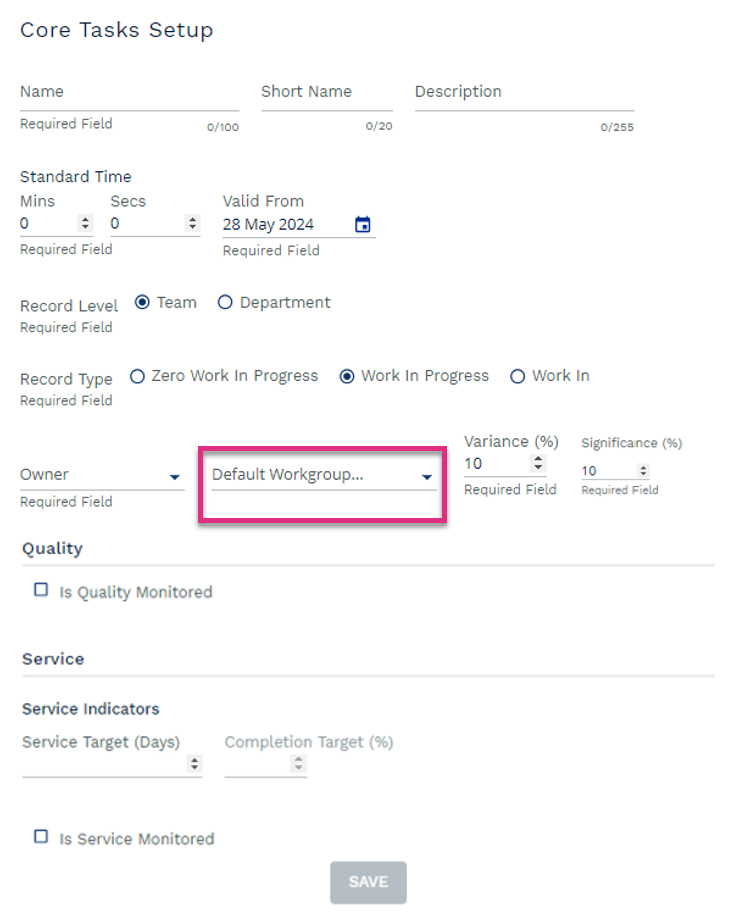
Default Workgroup
Determines the workgroup that Work In or WIP data will be allocated to if this data is entered using Connect.
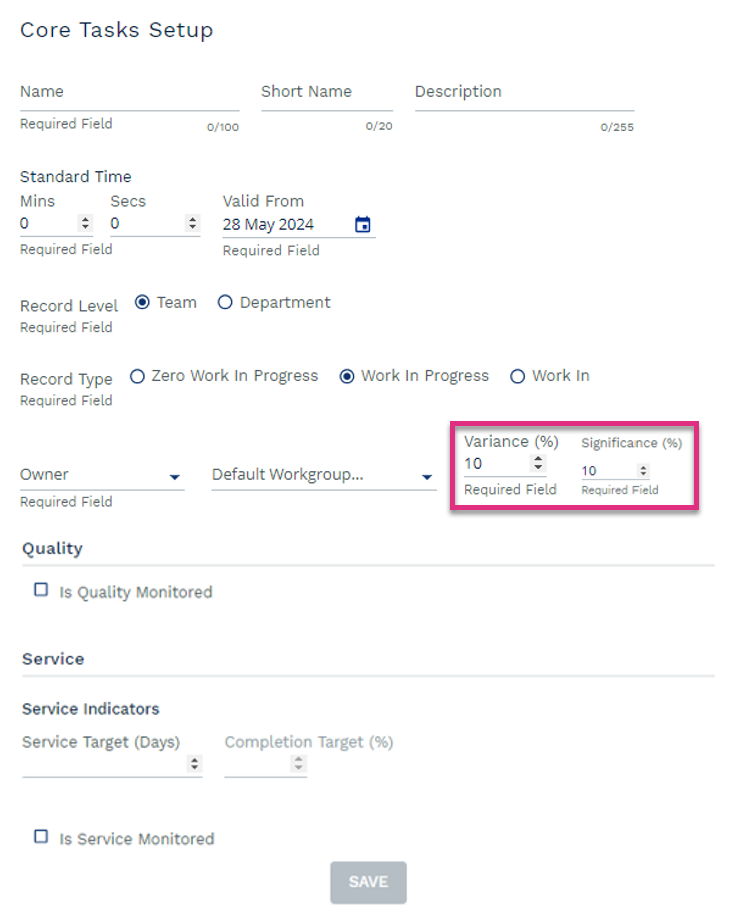
Variance and Significance
These values determine at what point a variance to plan will flag as red, amber or green in a Control report.
By default, they are set as 10% meaning that if a Core Task shows either a variance to plan of more than 10% or there is a variance to plan meaning the task now accounts for more than 10% of the team's total workload the task will flag as amber. A variance to either of more than 20% will flag the task as Red.
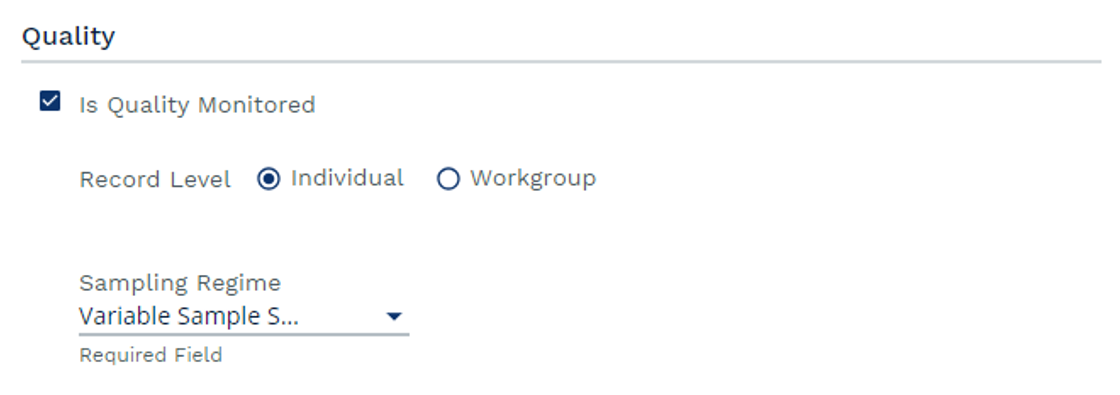
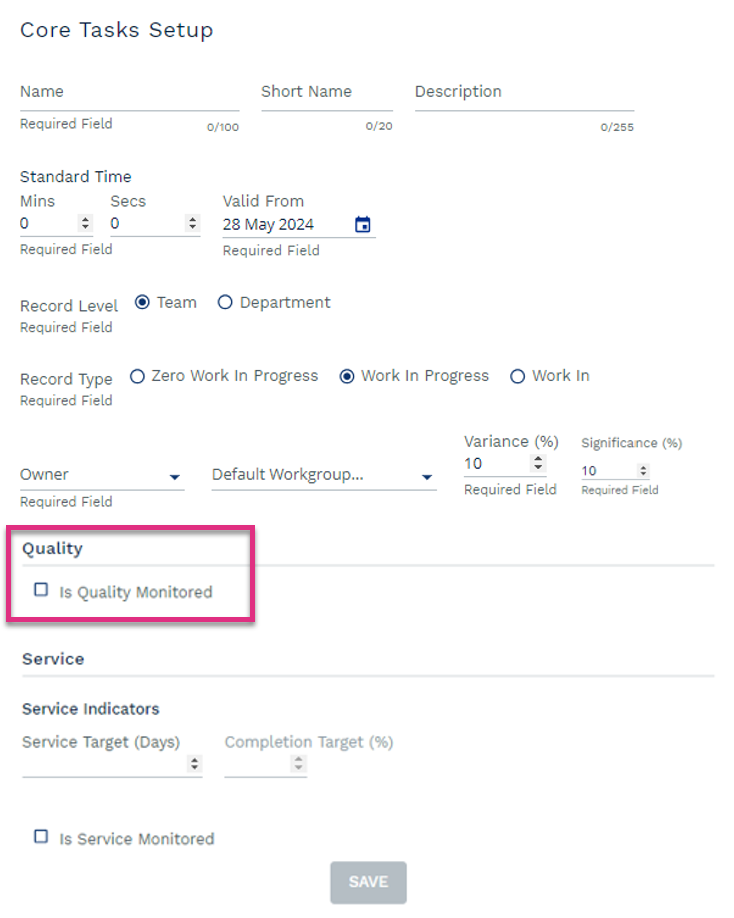
Quality
Allows you to enable the quality function for the Core Task, when the checkbox is selected, the section will expand to allow you to select if Quality data will be entered at a team or team member level in the Manage Data screen and select a sample size:
All items checked – the number of items displayed in the sample size section in Manage Data will be equal to the Work Out for that day.
Fixed sample size – select the percentage of the days total work out that will be sampled, this value will then display in the sample size section in Manage Data.
Variable sample size – the number of items sampled are manually entered into the sample size section of Manage data each day.
Please note that if Quality information is being captured at the team level, then the sample size will be variable.
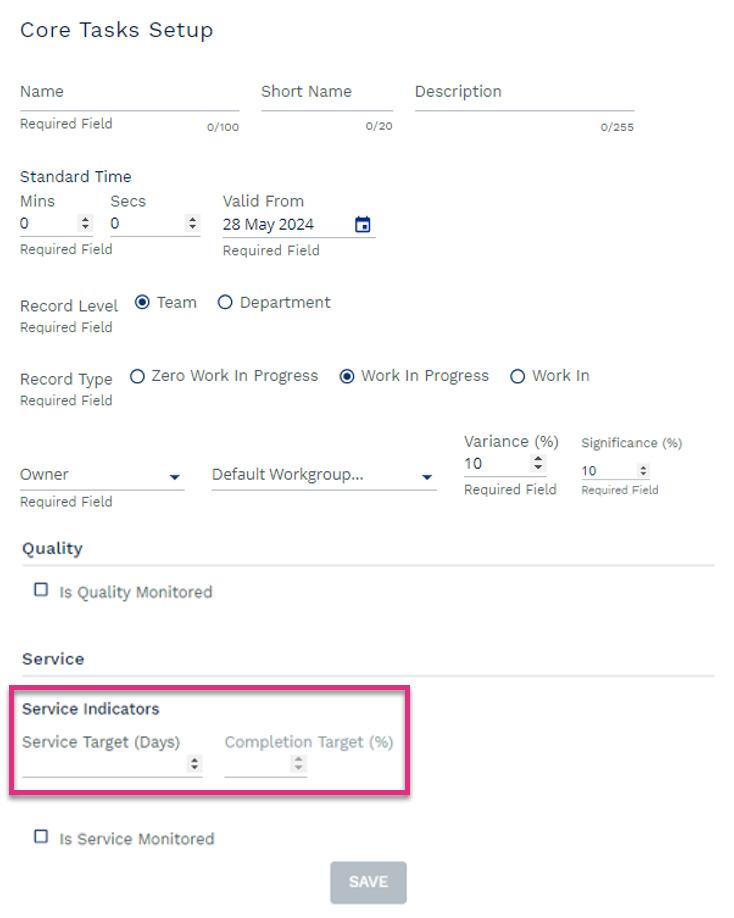
Service Indicators
Enables the Service Indicators feature and determines the thresholds used in Planning when using Service Indicators. The Service Target should represent the SLA days for the task and the Completion Target the percentage of work that needs to be completed within the SLA days for targets to be met. These values are applied to the calculations when determining the minimum amount of work out required to meet service or the policy stock value that should be maintained when planning.
Service
Allows you to enable the Service function for the Core task, when the checkbox is selected, the section will expand to allow you to select if Service data will be captured at a team or team member level in the Manage Data screen.
Save
Click here to save a new or edited Core Task.
Once you have created a Core Task you will need to assign it to the workgroups that will be capturing data against it.
Selecting the Core Tasks to Workgroup link in the Assign section of the Admin screen will allow you to assign or unassign Core Tasks to workgroups.
Workgroup Selector
Select the workgroup that you would like to assign or unassign core tasks from. The drop-down menu will display the workgroup you currently have selected in the hierarchy selector and any child workgroups.
Search
Allows you to search for core tasks using either a full or partial core task name.
Checkbox
Select the checkbox next to the names of any core tasks that you would like to assign or unassign.
If you select a task or tasks that are already assigned the un-assign button will appear next to the Search function.
Unassigning tasks will be effective from the following day.
If you select an unassigned task or tasks the assign selected task button will appear next to the Search function.
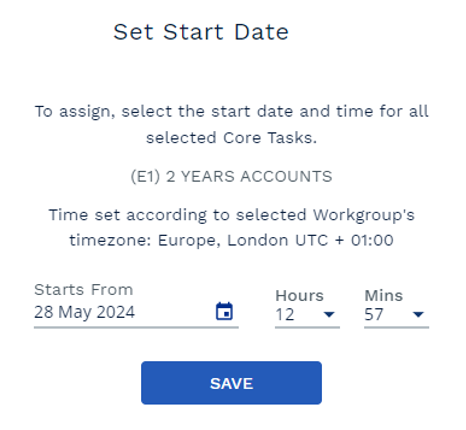
Selecting the assign selected task button will prompt the Set Start Date pop-up box to open where you can backdate the assign date of the task. Once set an assign date cannot be changed.
Please note you cannot assign and unassign tasks at the same time. These actions must be completed separately.
Name
Confirms the name of the Core Task.
Status
Confirms the date that the task will be assigned or unassigned from the selected workgroup.
The status will show one of 5 possible options:
Unassigned – the task is not assigned to the workgroup
Assigned – the task is assigned to the workgroup
Unassigned Status Pending – the task has been unassigned, and the change will complete the following day.
Assigned Status Pending - the task has been assigned, and the change will complete the following day.
Inherited – the task is a department level task and has been linked to a parent of the selected workgroup. To unassign inherited tasks you must select the parent workgroup.
Start Date of Status
Confirms the date that the task will be assigned or unassigned from the selected workgroup.
Clicking the icon allows you to unassign or cancel a pending assignment for a single task.
Clicking the icon allows you to assign a single task.
Within ControliQ Diverted tasks are activities that will be displayed to your team members to capture minutes spent completing the activity against, Diverted tasks do not have items logged against them.
When you select the Diverted Task link within the Add / View section of the Admin screen you will see a list of all of the Diverted Tasks that have already been created.
Name
Displays the name of existing Diverted Task.
Short Name
Displays a shortened version of the Diverted Task name if one was added during setup.
Description
Displays a description relating to the Diverted Task if one was added during setup. This description will appear in the Information button in RTM data capture.
Total Productivity
Confirms if the Diverted Task is included in the calculation for Total Productivity displayed in Production and Control Reports.
Selecting the search icon will allow you to refine the list of Downtime category displayed. You can search by partial or full Diverted Task names.
Click the print icon to print a list of the existing Diverted Task.
Click the Filter option to refine the list of Diverted Task displayed by key attributes. To utilise the Filters option, select the attribute that you would like to filter by from the drop-down menu in the pop-up box.
Clicking the Tags icon allows you to select Tags that you would like to assign or un-assign from the Diverted Taks.
When the icon is clicked a pop-up box detailing the available Tags will open, select the Tags you would like to add or remove from the drop-down menu and click Save.
To edit an existing Diverted Task, click the pencil icon next to its name to open the setup dialogue box.
To delete an existing Diverted Task, select the trash can icon.
Please not that to delete a Diverted task it must be unlinked from all workgroups first. Once deleted the Task will no longer be present in RTM or managed data areas, all historical data will be retained.
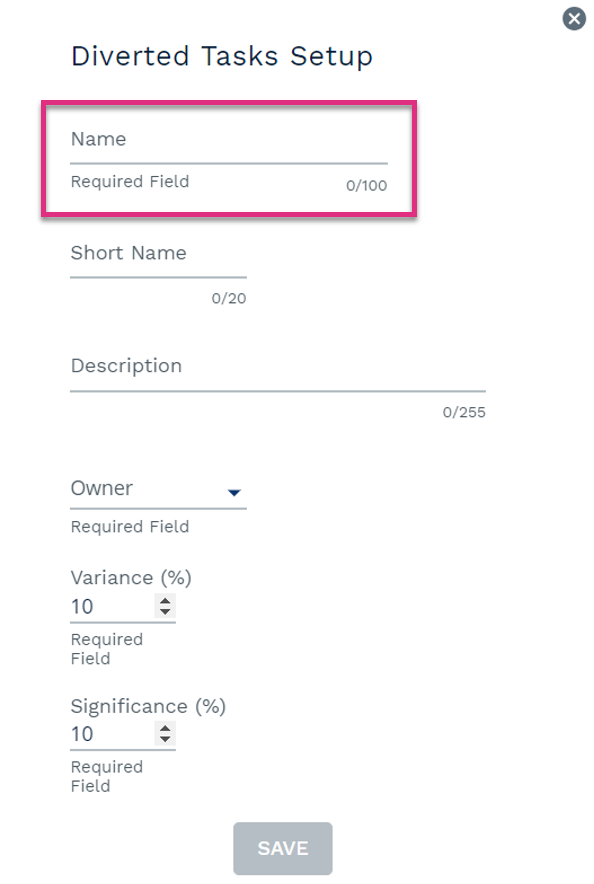
To create a Diverted Task select the icon next to the Diverted Task table header. This will prompt the Diverted Task setup form to open.
Name
Enter the name of the Diverted Task here (up to 100 characters) don’t forget to apply any standard naming conventions that have been agreed by your business.
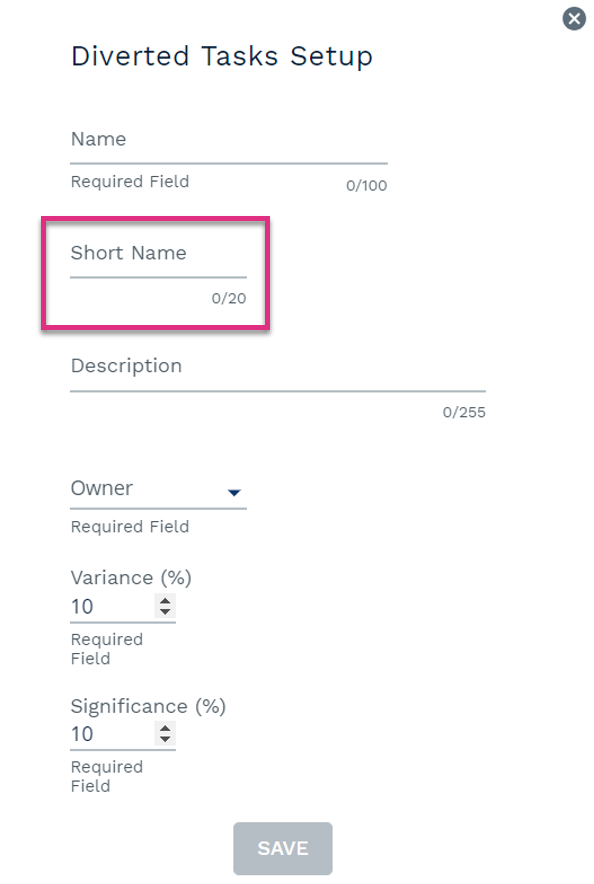
Short Name
This function will be applied to future development.
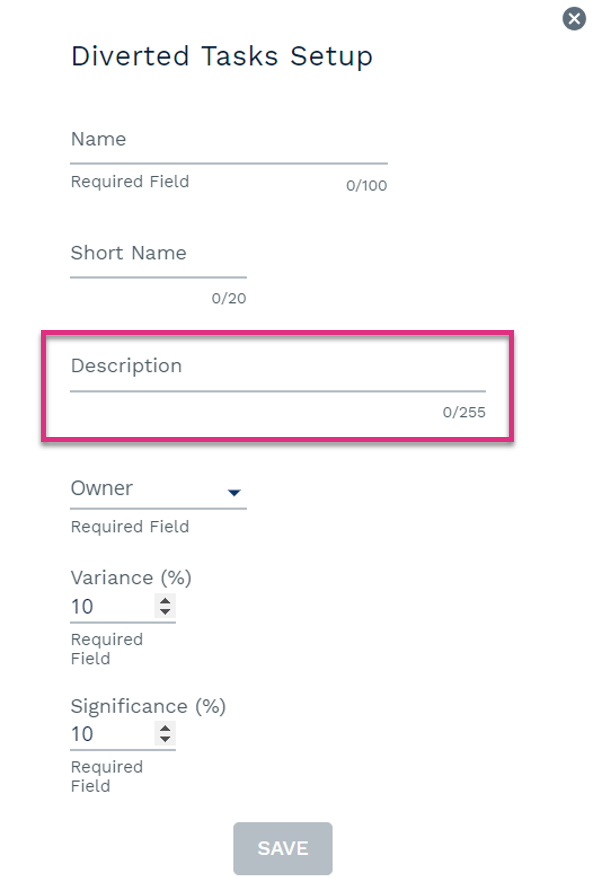
Description
You can add a description (up to 255 characters) to a Diverted Task, this description will then appear under the information button in RTM for users capturing data against the task.
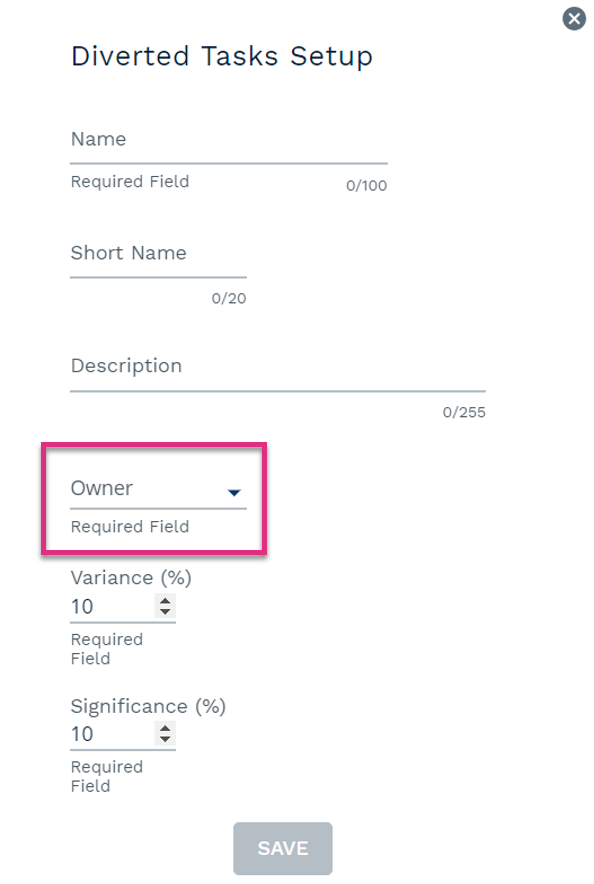
Owner
Specifies which workgroup in the organisation owns the task and determines the level of the hierarchy that an individual needs edit permissions for to make amendments to this task.
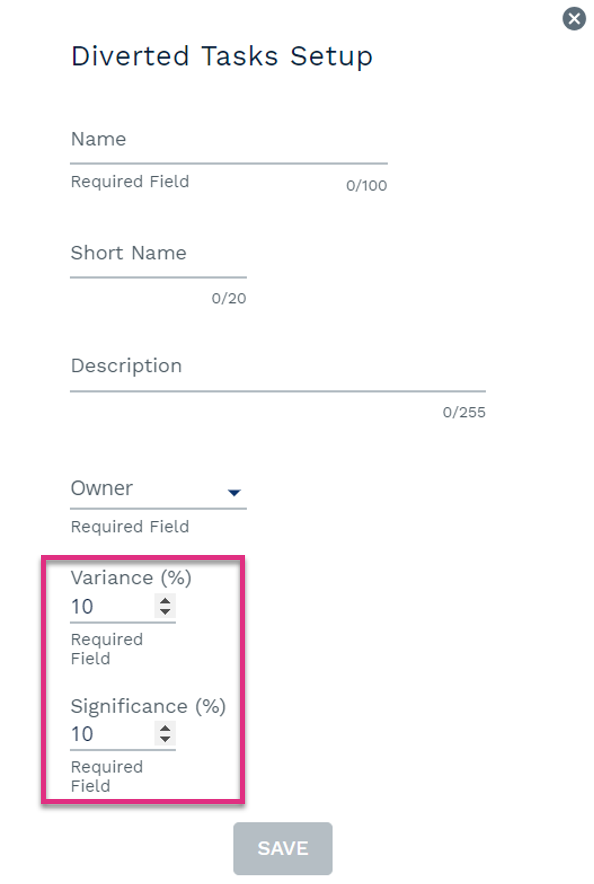
Variance and Significance
These values determine at what point a variance to plan will flag as red, amber or green in a Control report.
By default, they are set as 10% meaning that if a Diverted Task shows either a variance to plan of more than 10% or there is a variance to plan meaning the task now accounts for more than 10% of the team's total workload the task will flag as amber. A variance to either of more than 20% will flag the task as Red.
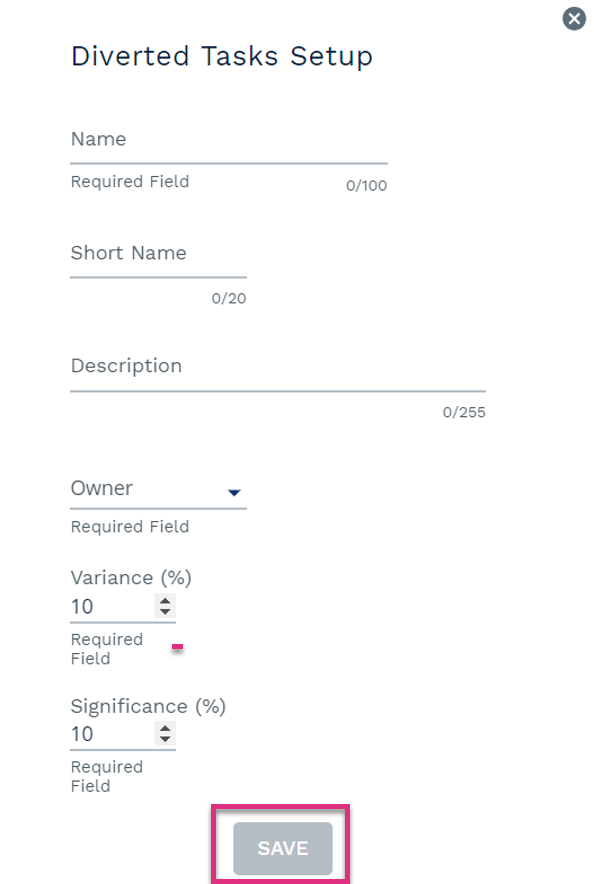
Save
Click here to save a new or edited Downtime category.
Enter the name of the Diverted Task here (up to 100 characters) don’t forget to apply any standard naming conventions that have been agreed by your business.
Once you have created a Diverted Task you will need to assign it to the workgroups that will be capturing data against it.
Selecting the Diverted Tasks to Workgroup link in the Assign section of the Admin screen will allow you to assign or unassign Diverted Tasks to workgroups.
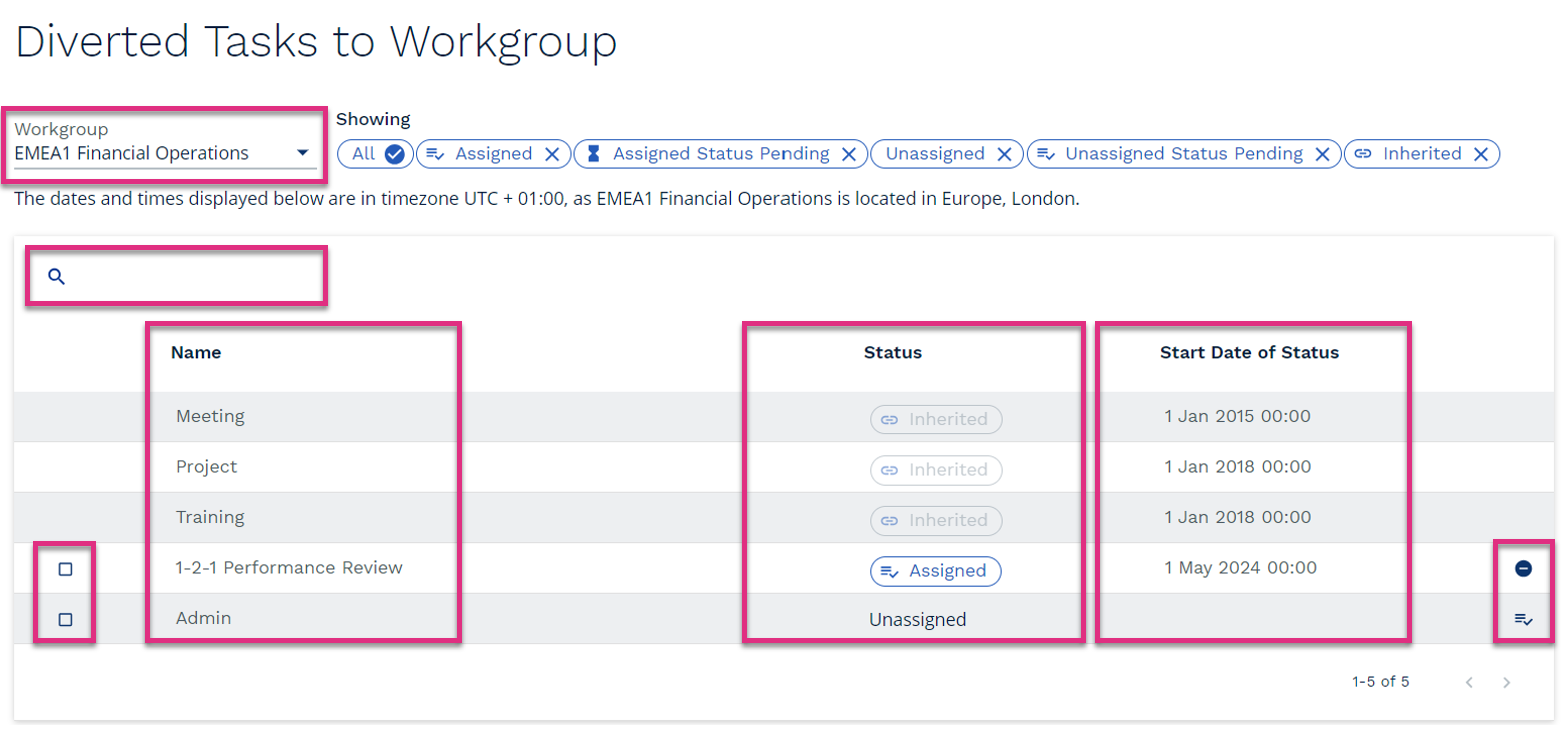
Workgroup
Select the workgroup that you would like to assign or unassign diverted tasks from. The drop-down menu will display the workgroup you currently have selected in the hierarchy selector and any child workgroups.
Search
Allows you to search for diverted tasks using either a full or partial diverted task name.
Checkbox
Select the checkbox next to the names of any diverted tasks that you would like to assign or unassign.
If you select a category or categories that are already assigned the un-assign button will appear next to the Search function.
Unassigning tasks will be effective from the following day.
If you select an unassigned task or tasks the assign selected task button will appear next to the task
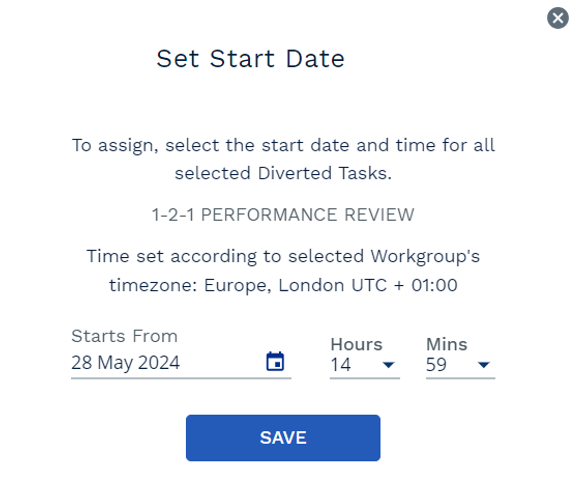
Selecting the assign selected task button will prompt the Set Start Date pop-up box to open where you can backdate the assign date of the task. Once set an assign date cannot be changed.
Please note you cannot assign and unassign tasks at the same time. These actions must be completed separately.
Name
Confirms the name of the diverted task.
Status
Confirms the date that the task will be assigned or unassigned from the selected workgroup.
The status will show one of 5 possible options:
Unassigned – the task is not assigned to the workgroup
Assigned – the task is assigned to the workgroup
Unassigned Status Pending – the category has been unassigned, and the change will complete the following day.
Assigned Status Pending - the category has been assigned, and the change will complete the following day.
Inherited – the task is linked to a parent of the selected workgroup. To unassign inherited categories you must select the parent workgroup.
Start Date of Status
Confirms the date that the task will be assigned or unassigned from the selected workgroup.
Clicking the icon allows you to unassign or cancel a pending assignment for a single task.
Clicking the icon allows you to assign a single task.


 icon next to the Core Task table header. This will prompt the Core Task setup form to open.